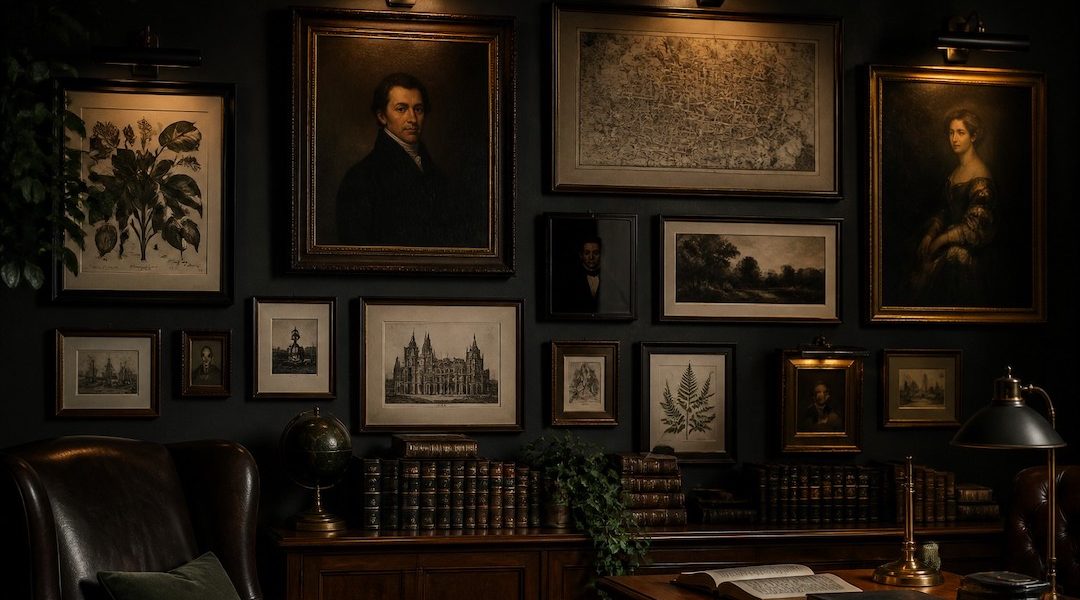

So, you’re looking to create a dark academia gallery wall, and you’re wondering how to incorporate black picture lights effectively? The short answer is: focus on strategic placement to highlight individual pieces, choose fixtures that complement the aesthetic, and don’t be afraid to mix and match sizes for visual interest. It’s all about creating an atmosphere that feels curated and a bit mysterious, rather than just throwing lights up for the sake of it.
Before we dive into the nitty-gritty of lighting Dabrews, let’s quickly touch upon what “dark academia” actually means for our purposes. Think classic literature, old libraries, historical architecture, and a general air of intellectualism and melancholy. It’s about celebrating knowledge, history, and a touch of gothic romance. For your gallery wall, this translates to specific types of art and objects, a particular color palette, and, crucially, a certain mood.
Embracing the Aesthetic: Colors and Textures
When considering your gallery wall, think rich, deep colors. Muted greens, deep blues, charcoal grays, and of course, plenty of black. Textures are important too – aged paper, worn leather, dark wood, and perhaps some tarnished brass or bronze. These elements will provide the backdrop for your illuminated pieces.
Curating Your Collection: What Belongs on the Wall?
Your dark academia gallery wall shouldn’t just be a random assortment of pictures. Think about what evokes the feeling you’re going for. This could include:
- Botanical prints: Pressed flowers, antique botanical illustrations.
- Architectural sketches: Old European buildings, Gothic cathedrals.
- Literary figures: Portraits of authors like Shakespeare, Austen, Poe.
- Vintage maps: Old world maps, celestial charts.
- Abstract art with a moody feel: Deep colors, textured brushstrokes.
- Photography: Black and white historical photos, moody landscapes.
- Objects: Small shelves holding antique books, a compass, a quill.
The key is to select items that feel cohesive and tell a story, even if it’s a subtle one.
Choosing Your Black Picture Lights: Function Meets Form
Now, let’s get to the star of the show: the black picture lights themselves. These aren’t just practical; they’re an integral part of the aesthetic. They should blend seamlessly with your dark academia theme, adding to the moody elegance rather than detracting from it.
Style and Finish: More Than Just Black
While “black” is the core requirement, there’s still variety. Consider:
- Matte black: This is often the go-to for a modern yet sophisticated look, and it tends to blend well without creating too much glare.
- Oil-rubbed bronze: This finish often appears very dark brown or almost black, with subtle metallic undertones. It can add a touch of vintage charm and depth.
- Antiqued black: Sometimes picture lights will have a slightly distressed or aged black finish, which perfectly complements the historical feel of dark academia.
Think about the other metallic accents in your room. If you have brass or gold, a black light with subtle warm undertones might work well. If everything else is starker, a pure matte black will be more suitable.
Size Matters: Proportionality is Key
This is crucial for a well-balanced gallery wall.
- For smaller frames (8×10 or smaller): You might opt for a single, focused spotlight-style picture light or a very short, minimalist bar light. The light source itself shouldn’t overpower the artwork.
- For medium frames (11×14 to 16×20): A typical 8-12 inch picture light bar will usually suffice. You want the light to spread across most of the artwork without spilling too much onto the wall around it.
- For larger frames (18×24 and up): Consider longer picture lights, perhaps 18-24 inches, to ensure adequate illumination across the entire piece. For very large or horizontal pieces, two smaller lights strategically placed might even work better than one long one.
A good rule of thumb is that the light fixture should be about half to two-thirds the width of the artwork it’s illuminating. This provides ample light without the fixture itself becoming the dominant visual element.
Light Source: LED for the Win
While traditional incandescent bulbs were once the norm, LED picture lights are the superior choice for a gallery wall, especially a dark academia one. Here’s why:
- Low heat emission: Traditional bulbs can generate significant heat, which can potentially damage artwork over time, especially antique prints or delicate paper. LEDs run cool.
- Energy efficiency: They consume far less electricity, saving you money in the long run.
- Longevity: LEDs last for thousands of hours, meaning you won’t be constantly climbing ladders to change bulbs.
- Color temperature control: Many LED picture lights offer different color temperatures, often measured in Kelvins (K). For dark academia, aim for a warmer light, something in the 2700K to 3000K range. This mimics the warm glow of candlelight or old incandescent bulbs, enhancing the cozy, historical feel. Cooler temperatures (4000K+) tend to feel more modern and sterile, which isn’t the vibe we’re going for.
Designing Your Gallery Wall Layout: More Than Just Hanging Pictures
This is where the artistry comes in. A dark academia gallery wall shouldn’t look perfectly symmetrical or overly “designed” in a modern sense. It should feel like it’s evolved over time, a collection of beloved pieces.
Sketching it Out: The Low-Tech Approach
Before you even think about putting holes in your wall, lay everything out on the floor. Arrange your frames, books, and other objects. Take pictures of different configurations. This allows you to experiment without commitment.
The Anchor Piece: Start with the Centerpiece
Typically, a gallery wall has a focal point. This might be your largest piece of art, or a particularly compelling one. Start by positioning this piece roughly where you want the center of your wall to be. Then, build outwards.
Asymmetrical Balance: The Dark Academia Way
Avoid perfect grids. Instead, aim for an asymmetrical balance. This means that while the overall visual weight feels balanced, the spacing and arrangement of individual pieces are varied. You might have a cluster of smaller frames next to a larger, single piece.
Incorporating Objects: Beyond Flat Art
Don’t limit yourself to just framed art. Small, dark wooden shelves can hold:
- Antique books: Especially those with interesting spines or worn covers.
- Curiosities: A vintage magnifying glass, an old brass compass, a small globe.
- Candlesticks: Unlit, of course, for ambience.
These three-dimensional elements add depth and interest to your wall, making it feel more like a curated collection.
Strategic Placement of Black Picture Lights: Highlighting Your Treasures
This is where the black picture lights truly shine. Their placement is key to enhancing the dark academia aesthetic, creating drama and drawing the eye to specific elements.
Individual Illumination: Spotlight Your Favorites
The most common and effective approach is to place a picture light above each piece you want to highlight. This creates a series of illuminated “moments” on your wall, guiding the viewer’s eye.
- Aim for even spread: The light should ideally illuminate the entire artwork evenly, without creating harsh hot spots or dark shadows within the frame. This might require angling the light slightly.
- Consider the frame: If your frames are thick or ornate, they might cast shadows. Adjust the light’s position or angle to minimize this.
- Vary the height: If you have multiple picture lights, don’t feel obligated to place them all at the exact same height above their respective frames. A slight variation can add to the organic, collected feel.
Group Illumination: When One Light Lights Many
Sometimes, you might have a very tight cluster of small frames. In this instance, a single, wider picture light placed above the entire grouping can work. This creates a single illuminated “zone” rather than individual spotlights.
- Ensure adequate coverage: Make sure the light is wide enough to cover the breadth of the grouping.
- Consider the spacing: This method works best when the frames are very close together. If there’s too much wall space between them, individual lights might be better.
Highlighting Objects: Beyond Flat Art
Don’t forget the three-dimensional elements!
- Shelf lighting: A small picture light placed above a short shelf holding antique books or curiosities can dramatically enhance their visual impact. It makes these objects feel more significant and pulls them into the overall narrative of the gallery wall.
- Directional lighting: Some picture lights allow you to adjust the direction of the light. Use this to cast interesting shadows or to highlight specific textures on your objects.
Avoiding Glare and Reflections: The Unseen Enemy
This is a common pitfall. Glare can ruin the effect of a perfectly placed light.
- Angle is everything: Experiment with the angle of your picture lights. Often, angling them slightly downwards and outwards from the wall can minimize reflections, especially on glass-covered artwork.
- Distance from the wall: The further the light source is from the wall and artwork, the wider the spread of light, but also potentially more glare. Conversely, too close can create a very harsh, concentrated light.
- Matte vs. glossy finishes: Artwork with a glossy finish or under glass is more prone to glare. If possible, consider non-glare glass or museum glass for your most prized pieces. Matte black light fixtures also help reduce glare from the fixture itself.
Wiring and Installation: Practicalities for a Polished Look
Once you’ve mapped out your layout and chosen your lights, it’s time for the actual installation. This part can be a bit more involved, but the payoff is a clean, professional-looking wall.
Hardwired vs. Plug-in: Which is Right for You?
- Hardwired: This is the most aesthetically pleasing option as there are no visible cords. However, it requires either existing electrical boxes above each picture location or hiring an electrician to run new wiring. This is a more permanent and often more expensive solution but yields the cleanest look.
- Plug-in with cord covers: Many picture lights come with a cord and plug. To maintain the dark academia aesthetic, you’ll want to conceal these cords. Black cord covers that match your wall color (if dark) or the light fixture itself can be painted to blend in. This is a more DIY-friendly option.
- Battery-operated: For very small, lightweight frames, battery-operated picture lights exist. While convenient, keep in mind battery life and the hassle of frequent battery changes, especially if you want your wall consistently lit. They also tend to be less powerful. For a substantial gallery wall, hardwired or plug-in with covers is generally preferred.
Measuring and Marking: Precision is Key
- Use painter’s tape: Once you’ve perfected your layout on the floor, transfer it to the wall using painter’s tape to mark the exact position of each frame.
- Mark light placement: Then, mark where each picture light will go, ensuring it’s centered over its artwork and at the desired height.
- Leveling: Always use a level to ensure your frames and lights are perfectly straight. A crooked light or frame can detract from the entire effect.
Concealing Cords: The Art of Discretion
If you opt for plug-in lights, hiding the cords is essential for a polished dark academia look.
- Cable management channels: These are plastic or metal strips that adhere to the wall and allow you to run cords invisibly. Choose black channels to blend in with your lights or wall.
- Paintable cord covers: Some channels are designed to be painted, allowing them to truly disappear against your wall.
- Routing behind furniture: If your gallery wall is above a console table or bookshelf, you might be able to route cords down behind the furniture to an outlet.
The Finishing Touches: Bringing it All Together
Once your lights are installed and your art is hung, take a step back and admire your creation. But a few final details can truly elevate your dark academia gallery wall.
Dimmer Switches: Setting the Mood
If your picture lights are dimmable (and many LED ones are), definitely consider adding a dimmer switch. This allows you to adjust the intensity of the light, perfect for creating different moods. A slightly dimmed light can enhance the mysterious, cozy atmosphere of dark academia, while brighter light can highlight details for closer inspection.
Accessorizing the Space: Beyond the Wall
Think about the elements around your gallery wall.
- Deep-toned curtains: Velvet or linen curtains in dark, rich colors can frame your wall beautifully.
- Antique furniture: A dark wood desk, a vintage leather armchair, or an old bookshelf filled with books will complement the aesthetic.
- Candles: Pillar candles in dark holders, or taper candles in ornate candelabras, can add to the romantic, dimly lit feel (just be mindful of fire safety!).
- Textiles: Throw blankets or pillows in rich textures like wool or faux fur, in dark hues, can make the space feel more inviting.
Living with Your Gallery Wall: Evolution is Key
A dark academia gallery wall isn’t a static display. It should feel like a living, evolving collection. Don’t be afraid to:
- Rotate pieces: Swap out artwork occasionally to keep the display fresh.
- Add new finds: If you come across a new antique print or a fascinating curiosity, find a place for it.
- Adjust lighting: As you live with the wall, you might find that certain pieces need more or less light, or that a slight adjustment to an angle makes a big difference.
Creating a dark academia gallery wall with black picture lights is about more than just decoration; it’s about crafting an atmosphere. By carefully selecting your art, choosing the right lighting, and paying attention to placement and installation, you can create a space that feels both intellectual and inviting, a true sanctuary for contemplation and creativity.